How to Attach Trekking Poles to an Osprey Backpack?
Trekking poles are a great help on steep climbs, river crossings and long descents. But sometimes you need your hands free to scramble over rocks, pull out a camera or take a break at a viewpoint. In those moments, knowing how to stow your poles on your pack quickly and securely is a real advantage. Osprey backpacks make this easy with built-in attachment systems on most of their hiking and trekking models. This guide explains how they work, how to use them step by step, and how to avoid common mistakes.
Why Stowing Your Trekking Poles Properly Matters
Carrying poles loosely in your hands, or shoving them through a random strap, can cause problems on the trail. A properly attached pair gives you several benefits:
- Your hands stay free for scrambling, snacks, maps and photos.
- The poles stay stable and don’t swing, rattle or snag on branches.
- Your pack’s balance and weight distribution stay comfortable.
- You lower the risk of dropping or losing a pole on a rocky slope.
- You can switch between hiking with poles and without them in seconds.
Understanding Osprey’s Trekking Pole Attachment Systems
Most Osprey packs use a system that Osprey calls Stow-on-the-Go. It lets you stash a pair of trekking poles without taking the pack off. Other models use more traditional methods, such as daisy chains and compression straps. Here is a quick overview of what to look for.
Stow-on-the-Go System
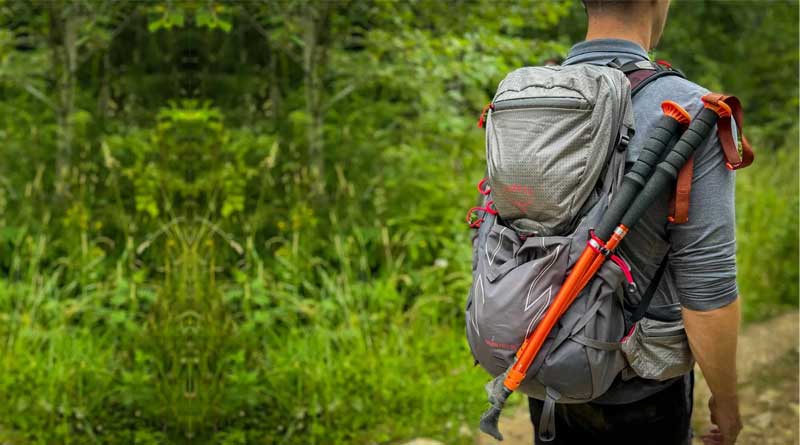
Stow-on-the-Go is found on many Osprey models. It usually has two parts: a small loop, bungee or tab located near the shoulder strap or upper side of the pack, and a bungee cord, elastic loop or strap near the bottom of the pack. You slide the pole tips into the lower attachment and the handles into the upper one, then tighten or secure them.
Bottom Loops and Upper Tool Loops
Some packs have a reinforced loop near the bottom and a second loop or elastic cord higher up. These are meant for trekking poles or ice axes. The lower loop holds the tips or shafts, while the upper one holds the handles or pole body.
Side Compression Straps
Almost every Osprey pack has side compression straps. They are meant for tightening the load, but they work well as a backup way to secure poles. They are especially useful if your pack doesn’t have Stow-on-the-Go.
Osprey Models and Their Pole Attachment Features
Features vary by model and by year, so always check your pack’s product page or manual. The table below gives a general idea of how different Osprey pack types handle trekking poles.
| Pack Type | Typical Attachment Method | Best For |
|---|---|---|
| Daypacks | Stow-on-the-Go or bungee loops with a lower tab | Short hikes and quick stops |
| Weekend and multi-day packs | Stow-on-the-Go plus tool loops and compression straps | Overnight and multi-day trips |
| Technical or mountaineering packs | Dual tool loops, daisy chains and ice axe attachments | Alpine routes and scrambling |
| Ultralight packs | Minimal bungee cords and simple elastic loops | Fast and light hiking |
What You Need Before You Start
You don’t need special equipment. A few simple things will make the process smoother:
- A pair of trekking poles, collapsed or folded to a manageable length.
- Your Osprey backpack with its attachment points visible and accessible.
- Optional extras, such as a small hook-and-loop strap or a spare bungee cord, for extra security.
Step-by-Step: How to Attach Trekking Poles Using Stow-on-the-Go
Step 1: Collapse and Lock Your Poles
Shorten your poles so they sit neatly alongside your pack. If you have telescoping poles, collapse them and make sure each section is locked. Folding poles should be fully folded and the cord should be tight. A compact pole is less likely to catch on trees or other hikers.
Step 2: Locate the Lower Attachment Point
Find the bungee, loop or tab near the bottom of your pack. On many models, it sits low on the side panel. Pull it open or slide it aside so there is space for the pole tips.
Step 3: Insert the Pole Tips
Place the tips of both poles through the lower loop or elastic cord. Keep the tips together and pointing downward. If your poles have sharp carbide tips, check whether they are covered with rubber tip protectors. Covered tips protect your pack fabric and the people around you.
Step 4: Secure the Upper Attachment
Bring the pole handles or upper shafts toward the upper attachment point, which is usually close to the shoulder strap. Slide them through the elastic loop or cord, or pull the strap over them and fasten it. Make sure the poles sit snugly against the pack.
Step 5: Tighten and Test
Pull the cord or strap until the poles feel firm. Give them a gentle shake. If they wiggle, tighten the straps or readjust the pole position. Then walk a few steps to check that the poles don’t bounce or hit your shoulder.
Many Osprey Packs Let You Stow Poles Without Removing the Pack
One of the best features of Stow-on-the-Go is that you can use it while wearing the pack. With some practice, you can stow and retrieve your poles in a few seconds.
- Hold both poles together in one hand.
- Reach back with the other hand and open the lower loop.
- Guide the pole tips into the lower loop while keeping the handles in front of you.
- Lift the handles up and over your shoulder, into the upper attachment.
- Tighten the cord and continue hiking.
It may feel awkward the first few times, so practice at home or on an easy trail before you need it in a real situation.
Alternative Method: Using Side Compression Straps
If your pack has no dedicated pole system, or you want extra security, the side compression straps work well.
How to Do It
- Loosen the side compression straps so they open fully.
- Lay the collapsed poles vertically along the side of the pack.
- Thread the straps over the poles and through the buckles.
- Pull the straps tight until the poles are held firmly against the pack.
- Tuck any loose strap ends away so they don’t flap.
This method is secure and simple. The only downside is that you usually have to take the pack off to do it.
Alternative Method: Using Tool Loops and Daisy Chains
Some Osprey packs, especially those aimed at alpine or technical use, have tool loops, daisy chains or ice axe attachments. You can use these to secure trekking poles too.
- Slide the pole tips into the lower tool loop.
- Bring the poles upward along the back or side of the pack.
- Secure the shafts with the upper loop, a bungee cord or a spare strap.
- Check that the poles are well away from your head and neck.
This works best when your poles are collapsed fully and stay close to the pack body.
Tips for Carrying Poles Safely and Comfortably
- Always cover sharp pole tips before attaching them to your pack.
- Keep the poles as flat and close to the pack as possible.
- Place the handles on the side that feels most comfortable for your shoulder.
- Check the attachment after the first few minutes of walking, as straps can loosen.
- Avoid stowing poles so high that they hit your head when you look up.
- Be aware of your surroundings in dense forest, where poles can catch on branches.
Common Mistakes to Avoid
| Mistake | Why It’s a Problem | Better Approach |
|---|---|---|
| Leaving poles too long | They stick out and snag on trees or rocks | Collapse or fold them fully |
| Loose attachment | Poles rattle, shift or fall off | Tighten the cord or strap and test |
| Uncovered tips | Can damage the pack and injure people | Use rubber tip protectors |
| Poles too high | Handles may hit your head or neck | Position handles near the shoulder, not above it |
| Using only one attachment point | Poles swing and cause imbalance | Use both the lower and upper points |
How to Keep Your Poles Secure on Rough Terrain
When you are hiking on rocky or uneven ground, your pack moves more, so poles need extra care. Before heading into a tricky section, double-check each strap. If you are scrambling, consider stowing the poles in the most secure way possible, even if it means taking the pack off for a minute. A pole that slips out during a scramble could fall down a slope or get lost for good.
In windy conditions, poles can catch the breeze and act like sails. Keep them tight against the pack and make sure they don’t stick out above your head.
Maintenance and Care for Your Attachment Points
Bungee cords and straps can wear out over time. Dirt, sun exposure and repeated stretching all reduce their strength. A few simple habits will extend their life:
- Rinse off mud and sand after muddy trips.
- Let the pack dry completely before storing it.
- Inspect elastic cords for fraying or loss of tension.
- Replace worn bungee cords with similar ones of the same thickness.
- Check stitching around the loops, especially if you carry heavy gear.
Frequently Asked Questions
Can I attach trekking poles to any Osprey backpack?
Almost every Osprey pack can carry poles in some way, either through built-in loops or by using side compression straps. Models with Stow-on-the-Go make it the easiest.
Can I stow poles while wearing the pack?
Yes, on packs with Stow-on-the-Go. It takes practice, but it quickly becomes second nature.
Do I need to collapse my poles first?
Yes. Collapsed poles are safer, more compact and much less likely to snag or bounce around.
Will trekking poles damage my pack?
Not if you cover the tips and secure the poles properly. Bare carbide tips rubbing against fabric can cause wear over time.
What if my pack has no bungee loops?
Use the side compression straps or any available daisy chain loops. A small extra strap can also help hold the poles in place.
Final Thoughts
Learning how to attach trekking poles to an Osprey backpack is a small skill that makes a big difference on the trail. Whether your pack has Stow-on-the-Go, tool loops or just compression straps, the key principles are the same: collapse your poles, protect the tips, use two attachment points and always test the hold before moving on. With a little practice, you’ll be able to stow and retrieve your poles in seconds, keeping your hands free and your hike smooth from start to finish.